;w.focus();)
Does YOUR Spectrum-Analyzer offer THIS too?
Measured with our active Differentiel Probe and a SPECTRAN NF-50xx unit with DDC (option 005).
Super high resolution of a ADSL upstream. Showing Sweep, Shadow, AVG and HOLD at the same time.
;w.focus();)
Does YOUR Spectrum-Analyzer offer THIS too?
Measured with our active Differentiel Probe and a SPECTRAN NF-50xx unit with DDC (option 005).
Super high resolution of a ADSL Upstream (AVG-Display). Free number of manual marker can be set.
;w.focus();)
Does YOUR Spectrum-Analyzer offer THIS too?
Measured with the internal sensor coil (standard) of a SPECTRAN NF-50xx unit with DDC (option 005).
Ultra high resolution of the "heating up" period of a switching power supply (AVG-Display). Quadratic mean of measurement results of the 10 auto-marker.
(If the windows are placed "wrong", just start the Software with holded STRNG-Button.)
This Function is automatically set "on":
![]()
Profil-menu:
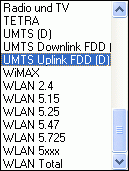
Select the desired profile (for example DECT)
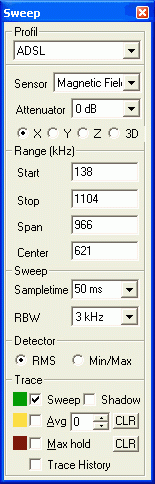
Sensor = Choose Sensor of NF-SPECTRAN [Magnetic Field, E-Field, Stat.Magnet., Analoginput.]
Attenuator = Choose Attenuator of NF-SPECTRAN [Auto, 0dB, 10dB, 20dB, 30dB, 40dB]
X = Choose X-Axis of NF-Magnetic Field Sensor
Y = Choose Y-Axis of NF-Magnetic Field Sensor
Z = Choose Z-Axis of NF-Magnetic Field Sensor
3D = Activate Isotrop (3D) Measuring of NF-Magnetic Field Sensor
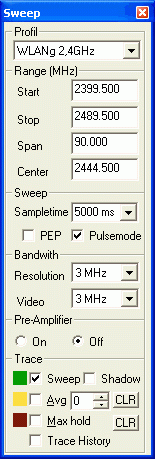
Range-menu (HF):
Start = START-Frequency [MHz]
Stop = STOP-Frequency [MHz)
Span = FREQUENCY span (Start to Stop) [MHz]
Center = CENTER-Frequency [MHz]
Range-menu (NF):
Start = START-Frequency [kHz]
Stop = STOP-Frequency [kHz)
Span = FREQUENCY span (Start to Stop) [kHz]
Center = CENTER-Frequency [kHz]
Sweep-menu: (HF)
Sampletime = SAMPLETIME (1mS to 10000mS) [mS]. A Sampletime lower than 100mS is only usable with the SPECTRANV4.
PEP = Peak Envelope Power Measuring (as long as saved in Profil), otherwise the Measurement will be in RMS.
Pulsmode = PULSMODE [ON/OFF]
Sweep-menu: (NF)
Sampletime = SAMPLETIME (50mS to 10000mS) [mS].
RBW = FilterBandwith (RBW).
Bandwith-menu:
Resolution = FilterBandwith (RBW)
Video = Videofilter (VBW)
Pre-Ampliefier:
Turn ON/OFF the optional Pre-Amplifier of the Spectran4
Detector-menu:
Choose between RMS and Min/Max
Trace-menu:
Sweep = Show regular Sweep
Shadow = Activate Sweepshadow
Avg = Activate Average. Aside: Choose number of Sweeps, wich should be used (1-100). Aside (CLR): Delete Avg Cache.
Max hold = Activate HOLD Function. Aside (CLR): Reset HOLD-View.
Trace History = Any areas in the Spectrogram could be viewed again by
moving the mouse over the Spectrogram. By holding the left mouse
button, any areas could be marked. (AVG or Max Hold).
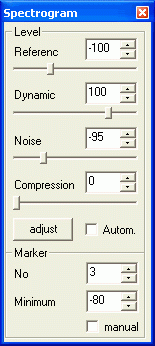
Level-menu (HF):
Reference = Adjust Reference level (lowest level, where anything should be displayed) [dBm]
Dynamic = Adjust Dynamic (dB over Reference level) [dB]
Noise = Adjust Noise level (All lower level will not be displayed) [dBm]
Compression = Continous compression of the Spectrogram from 1:1 to
1:40. Allows a quick overview of mounts of datas [whole number]
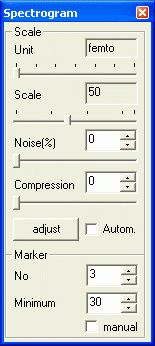
Scale-menu (NF):
Unit = Fix the unit, wich will be used for the Scale of the Spectrum [femto, pico, nano, micro, milli, 1:1, kilo]
Scale = Adjust Dynamic. Highest value, wich should be viewed [1 - 1000 bzw. LG10, LG100, LG1000]
Noise = Adjust Noise level (All lower level will NOT be displayed) [%]
Compression = Continous compression of the Spectrogram from 1:1 to
1:40. Allows a quick overview of mounts of datas [whole number]
Adjust = Allows a quick and optimal scale of the Spectrum- and Spectrogram-View per mouse click.
Autom. = Constant and ideal Scale of the Spectrum- and Spectrogram View.
Marker-menu (HF):
No. = Change number of Markers. Possible are 1-10 Marker.
Minimum = Level, from which on the marker will be showed [dBm]. Level-Resolution: 1dB.
Marker-menu (NF):
No = Change number of Markers. Possible are 1-10 Marker.
Minimum = PERCENTAGE (Relation between bottom edge and top edge of the
screen), from which on the marker will be showed [%]. Resolution: 1%.
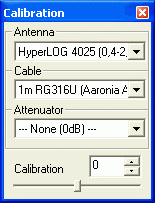
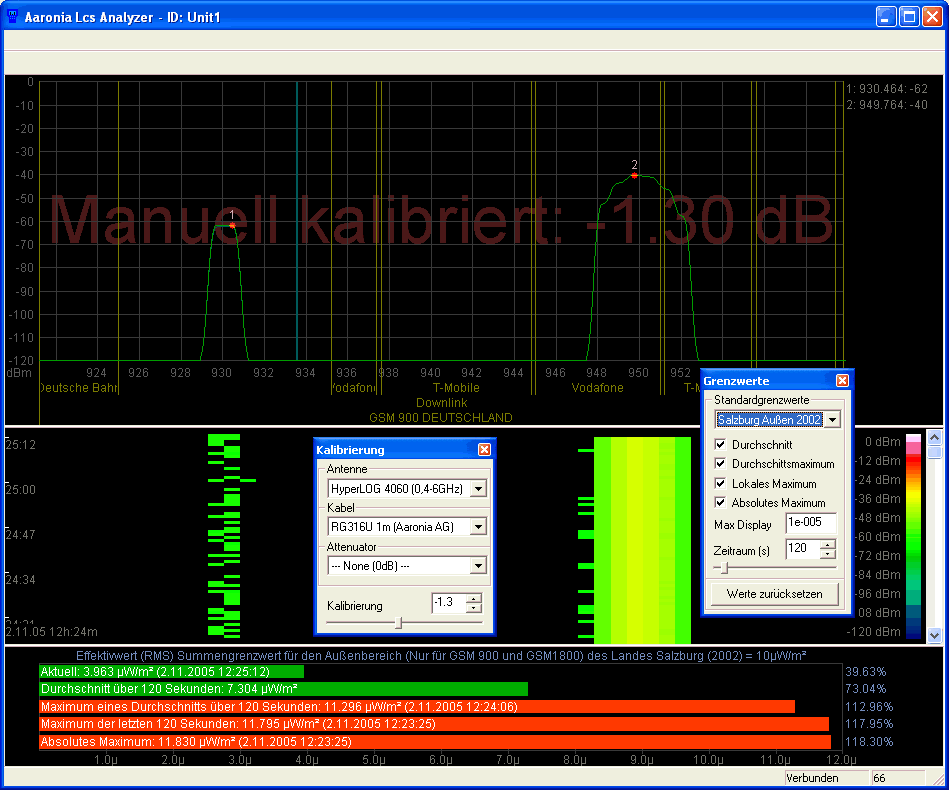
- "Antenna" = Here you can select EXTREMELY PRECISE calibration data of various antennas (exact to 10MHz!). The corresponding entries for our HyperLOG antennas are included.
By selecting "None (0dBi)", no antenna is being chosen. - "Cable" = Here, EXTREMELY PRECISE calibration data of a wide variety of cables can be selected. The matching entry for our included 1m RG316U cables is available as a preset.
By selecting "None (0dB)", no cable is being chosen. - "Attenuator" = Here you can select EXTREMELY PRECISE calibration data of a wide variety of attenuators. ATTENTION: This function is ONLY
applicable to the HF-6080! The matching entry for our 20dB attenuator
is already included.
By selecting "None (0dB)", no attenuator is being chosen. - "Calibration" (OFFEST) = Here you can perform a MANUAL PRECISION CALIBRATION using a slider or direct numeric entry. A really nice function, as this way precision is adjustable in 0,1dB steps! Hence, you can, for example, "normalize" the readings of SPECTRAN as close as 0,1dB to the readings of foreign units. Another use of this function would be to do a HIGHLY EXACT calibration of your SPECTRAN including the used cables, in the desired frequency range, using an external signal generator! As a precaution, the current setting is continuously being displayed in the spectrum window.
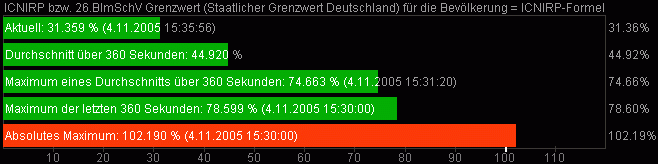
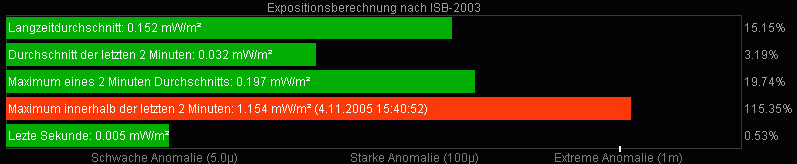
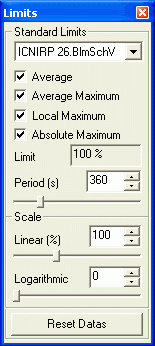
- "Standard Limits" = Here you can choose among different exposure limits. After you made your selection, the current reading is being displayed as a green bar with percentage. Upon exceeding the limit, the bar becomes red. Additionally, you can display up to 4 further bargraphs:
- "Average" = Displays the current average (over the exposure time).
- "Average Maximum" = Displays the highest average maximum (over the exposure time) that has ever occured.
- "Local Maximum" = Displays the current maximum over the exposure time.
- "Absolute Maximum" = Displays the highest reading that ever occured.
- "Limit" = Informational field. Displays the selected exposure limit and its unit.
- "Period" = Here you can adjust the timespan used for the functions "Average", "Average maximum" and "Local maximum" via slider or direct input.
- "Linear" = Here you can change the scaling of the exposure limit display. Very helpful with "overflowing" or "hardly changing" exposure limit readings.
- "Logarithmic" = Here you can change the "dynamics" of the exposure limit display. Especially helpful for getting "sudden peaks" or "very low rates of change" under control.
- "Reset Datas" = Resets all bargraphs. All exposure limit calculations are restarted.
"LCS" offers infinite possibilities for calculating and displaying exposure limits. Here are two examples:
Authoritative exposure limit calculation according to ICNIRP (as percentages):
Building biological exposure limits according to ISB-2003 (readings in mW/m2):
ADVANCED HINT: Press the right mouse button in the exposure limit window for loading CUSTOM exposure limits. These can be added to the file "limits.ini". Various examples of the complex functionality are already included, amongst others, a comparison (simultaneous display) of the old "Salzburg precautionary limit" and the ICNIRP limit. For the scripting master, everything is possible here ;-)
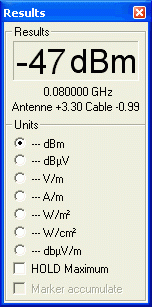
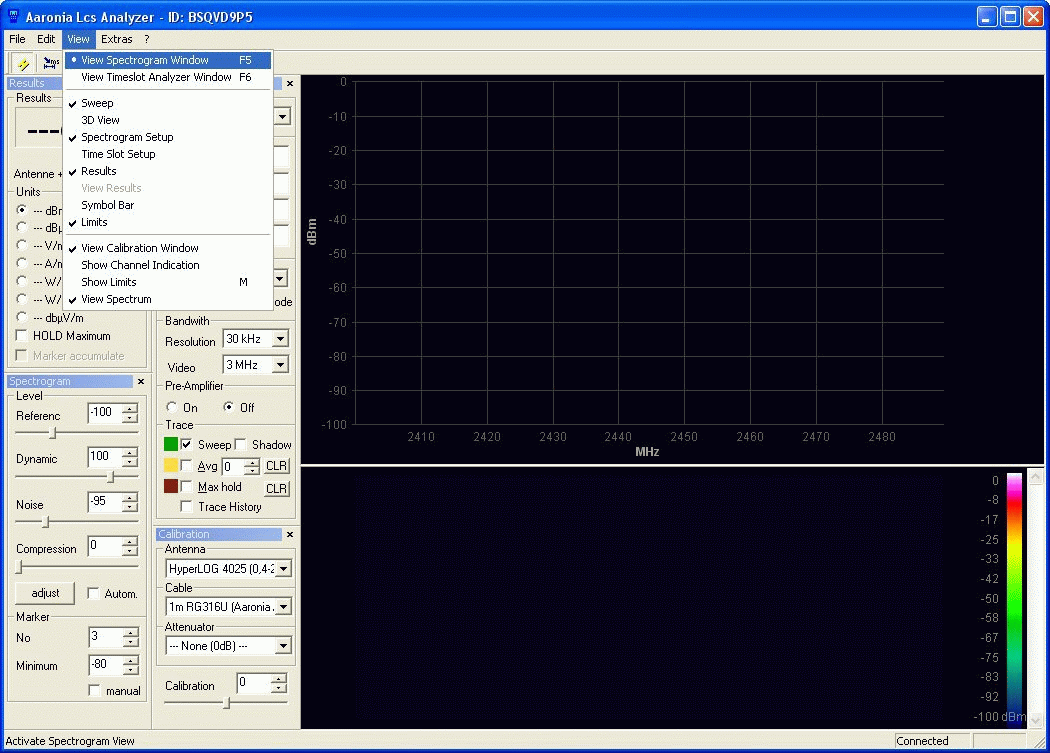
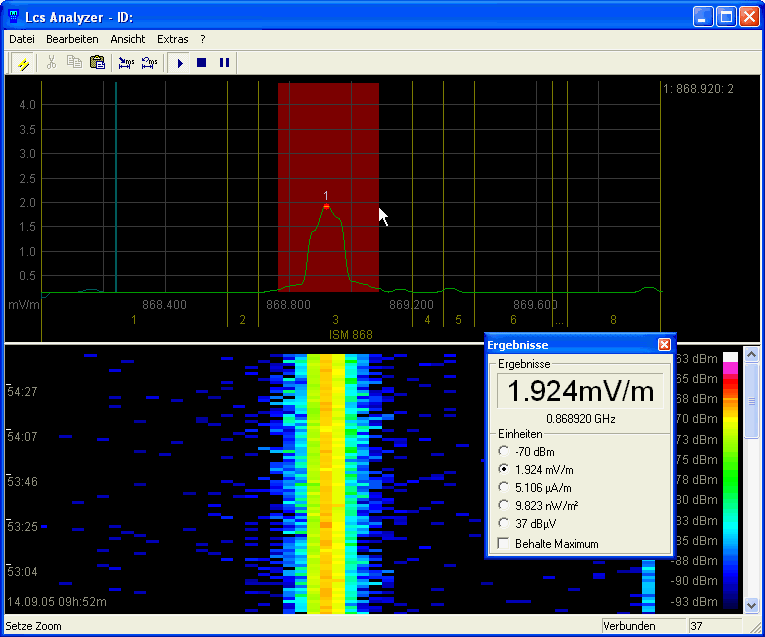
Results:
Shows the maximum reading and the corresponding frequency. The unit
selected under "Units" is being used for display. The size of the main
display (font size) is adjusted automatically. Furthermore, if there is
enough space, the unit is also being displayed in the big main display.
Units:
SIMULTANEOUSLY shows the current reading in dBm, dBµV, V/m, A/m and
W/m². In case of "small" values, an autorange feature (for example, pW/m²) is automatically activated.
You can also choose a physical unit here, which will be used
automatically for the spectrum display as well as the "Results" display.
"HOLD Maximum" activates the Hold feature.
"Marker accumulate" simply shows an accumulation of all Markers.
ATTENTION: The selected unit also influences the spectrum display. As
these values are not displayed logarithmically, it might be necessary
to adjust dynamics so that the complete sweep becomes visible again.
-
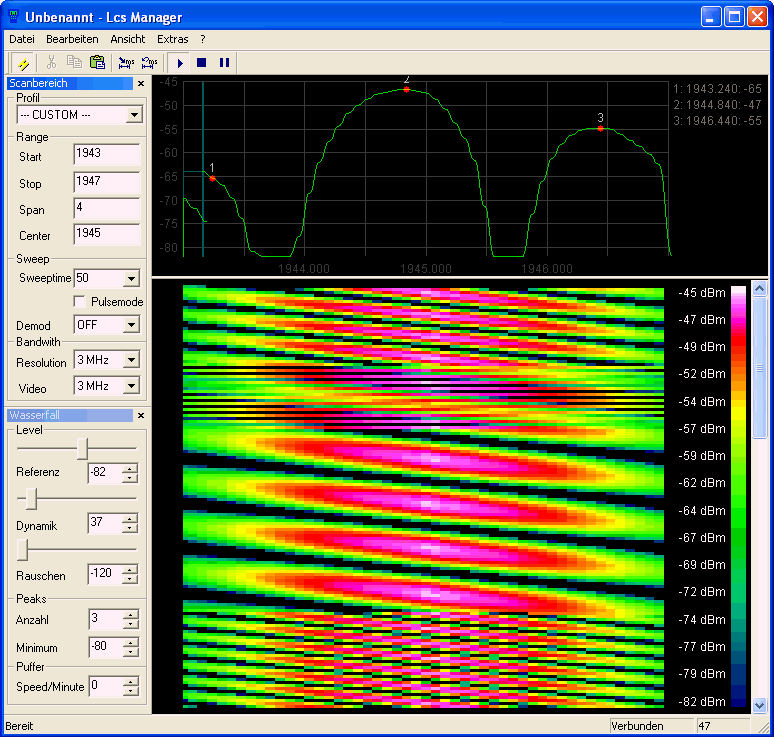
Well visible here: Optimal use of colour for displaying the level of a 1945 MHz signal modulated at different frequencies.
PRO feature: Up to 10! markers are being created automatically (what more could you ask).
By the way: the readings used to create the waterfall display can also be queried AT A LATER TIME. Just move your mouse to the desired spot in the diagram, and hold the CTRL key. While holding the CTRL key, you can also just continue moving your mouse. The values will get updated continuously.
-
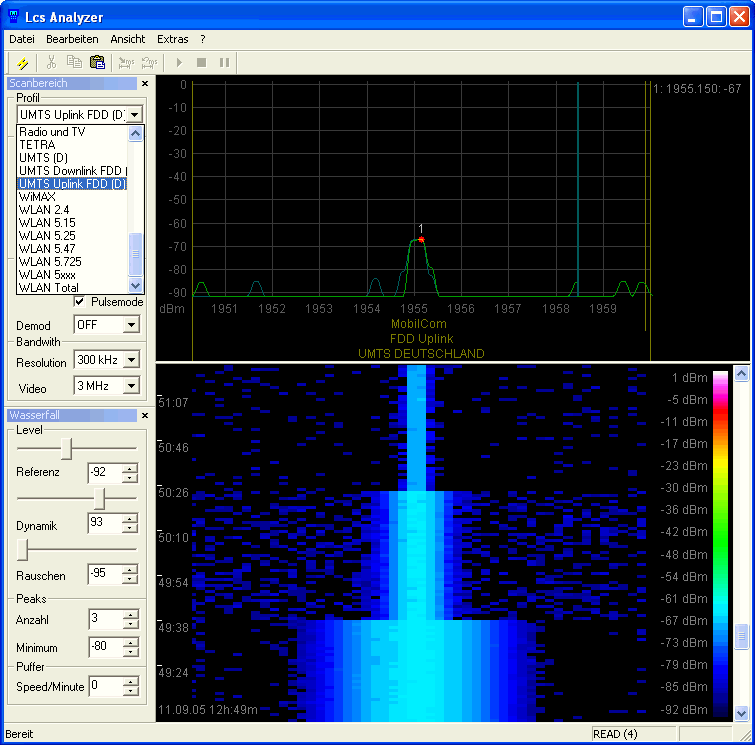
Nice
graphical display of the influence of various filter types on a single
UMTS signal (first 3MHz, then 1MHz, then 300kHz). Using the "Waterfall"
display, this weak signal is still well visible in spite of backgrund
noise:
-
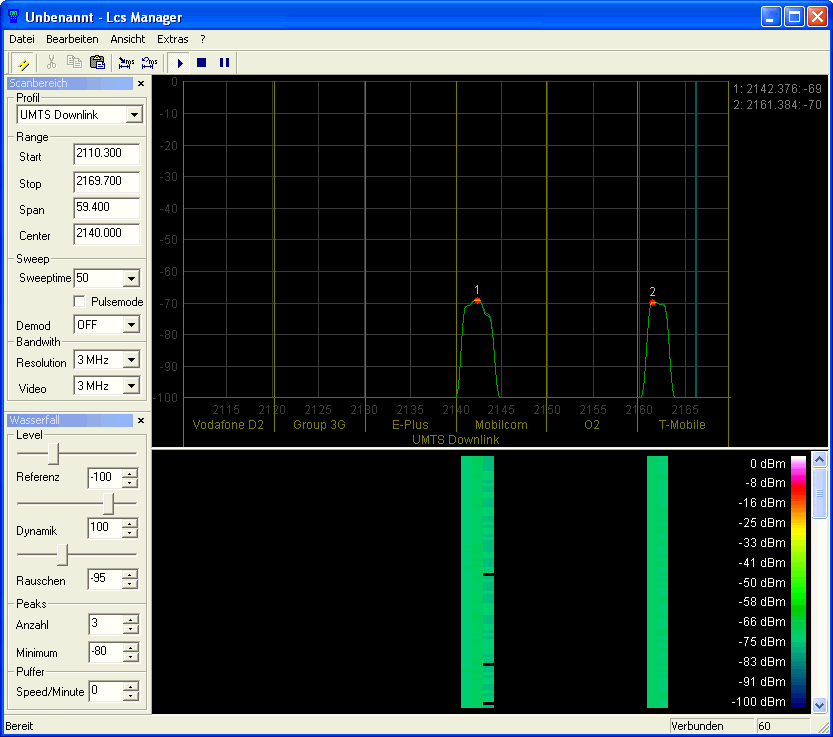
An amazing PROFESSIONAL feature is the display of channel grids! With this feature, arbitrary grids can be displayed and labelled in any
desired way. Using this feature, you can, for instance, visualize the
exact SERVICE PROVIDERS of transmission towers etc. in CLEAR TEXT,
WITHOUT the need for looking them up in tedious tables. Even several
hierarchical levels are possible: You could display an additional level
"Uplink" and "Downlink" in addition to the "Providers" level.
The channel labels can be toggled in the "View" menu using the "Display channel labels" option.
-
Want
exposure limits ? No problem with LCS. Various ways of displaying a
variety of exposure limits are at your disposal. Even a precise
calibration up to 0,1dB is possible with LCS:
-
The
intuitive zoom feature simplifies operation considerably. As shown,
simply select the desired range with your mouse, and a new, full
resolution sweep is initiated in the zoomed range. Simply AMAZING!
In the included file "scanprofile.ini", you can create CUSTOM profiles which then become available for instant selection in the spectrum analyser software. Various examples are already included.
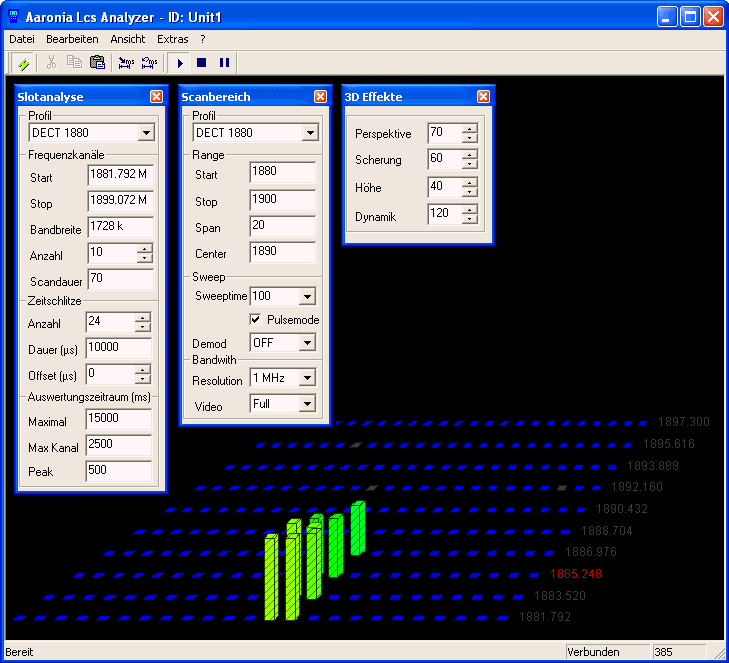
This is a true playground for the professional technician: This elaborate and complex level diagram allows, for instance, display of utilization of the individual channels including TIME SLOTS graphically. Here SPECTRAN truly shows off its capabilities! There are only a few very expensive high-end units which even offer this kind of functionality. Have fun building your own ;-)
Nicely visible in this example: DECT signals are, contrary to popular belief, a very complex THREE DIMENSIONAL signal and change position in TIME!
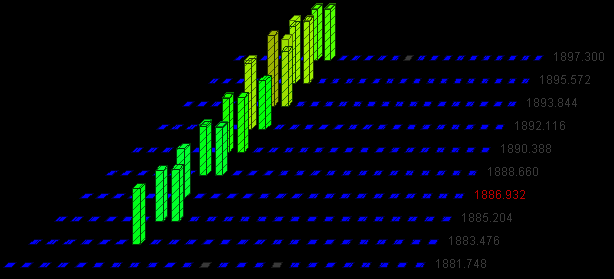
Nice to see: The signal of the DECT phone hase a position "in time"!
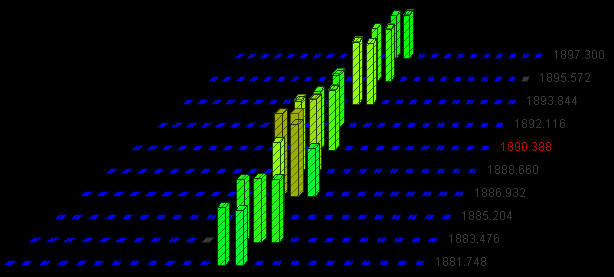
The new "position" of the DECT phone after the channelchange.
Does your spectrumanalyzer offer THIS too?
HINT:
In the included file "scanprofile.ini", you can create CUSTOM profiles
which then become available for instant selection in the spectrum
analyser software. Various examples are already included.
Afterwards, the following bargraph will appear:

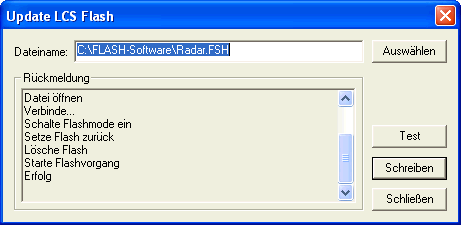

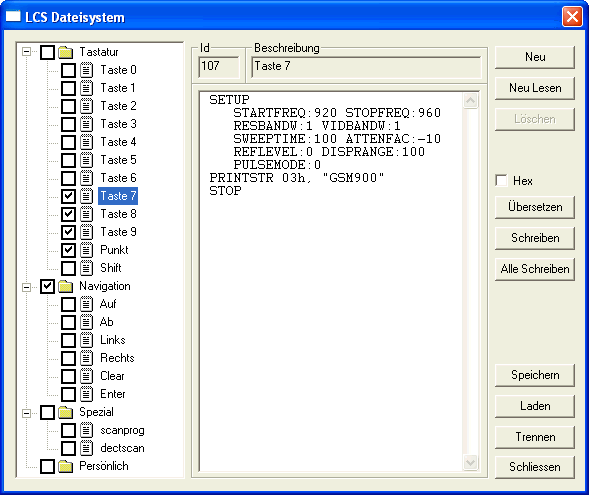
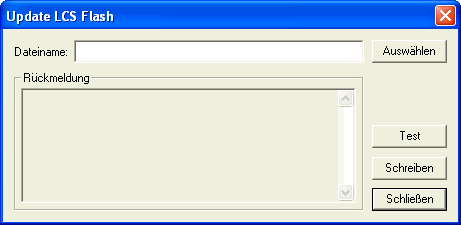
ATTENTION: For uploading changes or programs to SPECTRAN, you need to click on "Compile" and then on "Write"!
Key assignments can also be saved to and retrieved from disk by clicking "Save" or "Load".

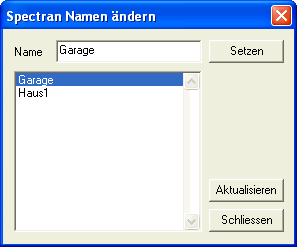
Enter the desired name for the respective SPECTRAN unit in the "Name" field.
Press "Set" to PERMANENTLY store the name in the SPECTRAN unit.
Press "Refresh" to refresh the list of currently connected SPECTRAN units. Use this button to find units which have been connected after launching LCS.
Simply choose the desired unit for acquiring readings or transmitting data.